Generation 4 Bike Pedal Development
We set out to make some great flat bicycle pedals that were simply better than the competition in every way that we could.
After a lot of brainstorming, we decided that the first step would be to scope out our competition. We performed hours and hours of research across Amazon, Youtube, and various bike blogs learning about what people say are their favorite features of flat bike pedals. From that research, we developed a list of things on which we wanted to focus.
We wanted to give people what they wanted in a flat style bicycle pedal in a premium package. The holy grail of bicycle flat pedals seemed to be building on existing commonplace designs to make pedals that were:
- Tougher
- Lighter
- Customized with color and styling
- Multiple sizes
- Better at gripping your shoe
- Adjustable screws for setting pedals up in concave or convex modes
- Serviceable for a long life
Now that we had our "voice of the customer" (VOC) down on paper, the next step was to really dissect some competitor's pedals to see what they did well, and what we thought we could improve upon. So, we ordered a couple different types of competitor pedals to start the investigation. We were pretty impressed with the different pedal's overall looks, and many competitors had some great Youtube marketing we thought. These things were anywhere from $200 - $300, which is slightly under what we imagined the holy grail pedal we will manufacture would cost.
Here are a couple of pics below of the competitor's pedals that we tried (logos redacted to protect their names!).


We liked the overall design of many of the competitors pedals. Here are a couple things we did not like and thought we could improve upon:
- We were not impressed with the overall machining on some of the pedals - lots of burrs and debris were found.
- In some cases, the threaded holes were not chased out, so again there were burrs.
- A couple we looked at had chatter marks in some of the machined areas.
- Several had end caps that were plastic.
- Many were received without the screws installed.
- Some came with screws that were black oxide screws (which will rust out horribly) and they came in an oily bag that leaked out oil everywhere into the cardboard packaging.
- Several had a pedal spindle shaft which was NOT made out of stainless steel.
- Overall, in several instances these seemed a little expensive for what you are getting...
With our voice of the customer and now this competitor analysis complete, we were now ready to start brainstorming some designs in CAD to try and hit on all of our improvements we had in mind!
We use Autodesk Fusion for our machine part designs because it is a great program for modeling part quickly, it is relatively inexpensive compared to the competition (like Solidworks which is nearly 10X the cost), and it can go straight from the model design into CNC machine code programming for running the parts on CNC mills and lathes. This helps us minimize design costs, prototype ideas quickly, and helps get the cost to manufacture lower so that we can charge lower prices to you!
Below are some pics of design ideas we modeled and worked on:


As you can see, we had a bunch of designs we would eventually throw out. But, this is all part of the design process. And it was great fun coming up with several different ideas and seeing how these hit upon our VOC.
For our flat bicycle pedal design, we wanted to build up the model in the following way:
- Design the internal spindle shaft first. We wanted to create a spindle shaft which we could use on the various size pedals (small, medium, large, extra large).
- After the pedal spindle shaft was designed, design what we call the "master shaft housing". this is the part of the pedal which the spindle fits into.
- From there, we could then extrude the flat portion of the pedal, get that shaped out, then mirror it to the opposite side.
- The next step is to add in the screws counter bores and threads for the size of screws we chose to use.
- Finally, we added all the fillets and chamfers to the design.
After three separate generations of designs, we finally arrived on what we are calling generation 4 (Gen4). This felt to the team like it was worthy of going onto the next step of the prototype process and actually machining a set to test. So, we moved onto creating drawings for these pedals, working on the CNC tool paths, and actually producing the pedals.
Below you will see a quick video we made of the first Gen4 pedals running on the CNC!
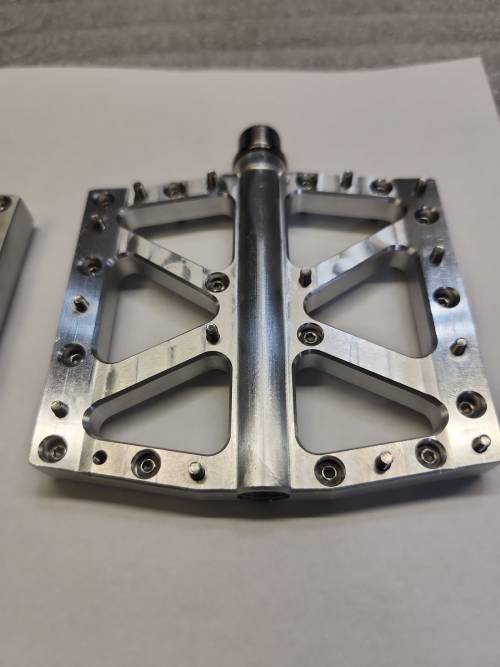
Here below you will see some pictures of the fully assembled Gen4 bike flat pedals in all their glory:


Coming up in the next post, we'll show the pedals getting mounted onto an electric mountain bike for testing! And we will review the things that went well with these Gen4 flat bike pedals, and the things we think we need to improve for the next generation. We learned a lot by actually making these prototypes, and we're excited that we are getting closer to bringing these mountain bike flat pedals to a bike near you!
Click here for the next post - part #2!
In the meantime, if you're reading this several weeks or months from when this was posted, check out our PEDAL section of the Moongate Cycles store and grab your pedals now!


